Tips
How To Paint A Bike Frame: Easy Step-By-Step
Are you a cycling enthusiast looking to give your beloved bike a fresh and vibrant makeover? Painting your bike frame can be a rewarding and cost-effective way to achieve a personalized look. In this comprehensive guide, HookBike will walk you through the easy step-by-step process of how to paint a bike frame, ensuring that you achieve professional-looking results that will make your bike stand out from the crowd.
Essentials for Painting a Bicycle Frame Yourself
Before we dive into the nitty-gritty of bike frame painting, let’s make sure you have all the necessary supplies ready. Here’s what you’ll need:
Safety Gear
Safety first! Ensure you have the following:
- Safety goggles: Protect your eyes from paint splatters and dust.
- Respirator mask: Guard against inhaling paint fumes.
- Nitrile gloves: Keep your hands safe from chemicals.
Cleaning Supplies
- Degreaser: To remove any dirt, grease, or old paint from the frame.
- Sandpaper (various grits): For smoothing the surface.
- Lint-free cloths: To wipe down the frame.
Painting Supplies
- Primer: Choose a high-quality metal primer.
- Paint: Opt for a paint suitable for metal surfaces.
- Clear coat: Protect the paint job and add shine.
- Painting tape: For masking off areas you don’t want to paint.
- Paintbrushes and/or spray paint: Depending on your preference.
Workspace Setup
Set up a well-ventilated, clean, and clutter-free workspace. This could be your garage or a dedicated area in your backyard. Ensure good lighting for precision work.
How To Paint A Bike Frame: Easy Step-By-Step
Now that you’ve gathered your supplies and set up your workspace, let’s get into the step-by-step process of painting your bike frame.
Step 1: Safety Precautions
Begin by donning your safety gear. Safety goggles, a respirator mask, and nitrile gloves are non-negotiable. Protecting yourself should always be the first priority.
Step 2: Remove Bike Components
To make the painting process easier, it’s best to disassemble your bike as much as possible. Remove the wheels, pedals, handlebars, and any other components that can be detached. This will give you better access to the frame.
Step 3: Clean and Degrease
Thoroughly clean the bike frame with a degreaser to remove dirt, grease, and old paint. Use a lint-free cloth to ensure the frame is completely dry before proceeding.
Step 4: Surface Preparation
Use sandpaper to lightly sand the entire frame. This step helps the primer adhere better to the surface. Start with a rough grit and gradually move to finer grits for a smooth finish. Wipe away any dust with a clean cloth.
Step 5: Apply Primer
Apply a thin, even coat of primer to the entire frame. The primer serves as a base for the paint and improves adhesion. Allow it to dry according to the manufacturer’s instructions. Typically, this takes around 24 hours.
Step 6: Sand the Primer
After the primer has dried, lightly sand it with fine-grit sandpaper to achieve a smooth surface. Wipe away any dust with a clean cloth.
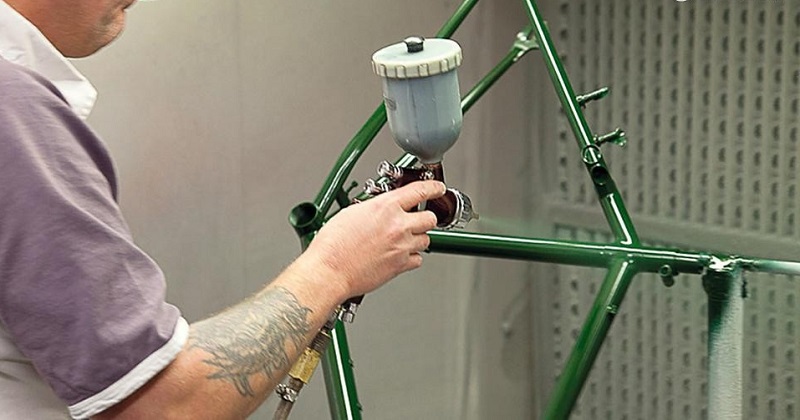
Step 7: Apply Paint
Now comes the fun part – painting your bike frame! Apply several thin coats of paint, allowing each coat to dry before applying the next. This will ensure a uniform and durable finish. Be patient during this step; rushing can lead to imperfections.
Step 8: Apply Clear Coat
Once the paint is dry, apply a clear coat to protect and add a glossy finish to your frame. Like the paint, apply this in thin coats and let it dry between applications.
Step 9: Reassemble Your Bike
After the clear coat has dried, reassemble your bike. Make sure all components are securely attached and functioning correctly.
Step 10: Final Touches
Inspect your newly painted bike frame for any imperfections or areas that may need touch-ups. Use touch-up paint and a fine brush to correct any blemishes.
With these easy steps, you can transform your bike frame with a fresh coat of paint. Just remember to follow safety precautions and take your time to achieve the best results.
See more: Bike Frame Size Chart

How much does it cost to paint a bicycle frame yourself?
The cost of painting a bicycle frame yourself can vary depending on several factors, including the quality of materials you choose, the type of paint, and whether you already have some of the necessary tools. Here’s a rough estimate of the expenses you might incur:
Paint: The cost of paint can range from $10 to $30 or more, depending on the type and brand you select. High-quality spray paint or brush-on paint will likely cost more than budget options.
Primer: A can of primer typically costs around $10 to $15.
Clear Coat (optional): If you choose to apply a clear coat for added protection and shine, expect to pay an additional $10 to $20.
Sandpaper and Abrasives: You’ll need sandpaper of various grits, which can cost around $5 to $10 in total.
Degreaser: A degreaser or cleaning solution might cost around $5 to $10.
Masking Tape: You’ll need masking tape for masking off areas of the frame, which usually costs a few dollars.
Drop Cloths or Newspapers: For protecting your workspace, these can be acquired inexpensively or even for free.
Safety Gear: If you don’t already have safety gear like gloves, a respirator mask, and safety goggles, you may need to purchase them, which could cost around $20 to $50 in total.
Tools: Depending on your existing tool collection, you may need to invest in some basic tools, such as screwdrivers or wrenches, which can vary in cost.
Bike Frame Repair or Prep: If your bike frame requires any repairs or prep work, such as removing rust, you might need to budget for additional materials and tools.
The total cost can vary widely based on your choices and whether you need to purchase tools or safety equipment. However, a rough estimate for the basic materials needed for a DIY bike frame painting project might fall in the range of $50 to $100 or more. Keep in mind that this estimate doesn’t include any specialized equipment or services that you may choose to use, such as a paint booth or professional powder coating, which could significantly increase the cost.
See more: How To Fix Paint Chips On Your Bike?
Tips for Preserving a Bicycle Frame After Painting
Preserving a bicycle frame after painting is essential to maintain its appearance and durability. Here are some tips for taking care of your painted bicycle frame:
Allow Ample Drying Time: After painting, make sure to let the paint and clear coat (if used) dry completely according to the manufacturer’s instructions. Rushing this step can lead to imperfections and premature wear.
Handle with Care: Be gentle when reassembling and working with the frame after painting. Avoid scratching or chipping the freshly painted surface.
Keep it Clean: Regularly clean your bike frame with a soft cloth or sponge and mild soapy water. Avoid abrasive cleaners or materials that could scratch the paint.
Inspect for Damage: Periodically inspect the frame for any signs of chipping, cracking, or bubbling in the paint or clear coat. Address any issues promptly to prevent further damage.
Use Frame Protectors: Apply frame protectors, such as clear adhesive strips or patches, to areas that are prone to wear and tear, like the chainstay or cable rub points.
Avoid Harsh Chemicals: Stay away from harsh chemicals or solvents when cleaning or performing maintenance on your bike, as they can damage the paint.
Store Indoors: Whenever possible, store your bike indoors in a cool, dry place. Exposure to extreme temperatures, humidity, or prolonged sunlight can harm the paint over time.
Protect During Transport: When transporting your bike on a rack or in a vehicle, use protective covers or padding to prevent scratches and paint damage.
Touch-Up as Needed: Keep a small quantity of touch-up paint on hand to fix minor scratches or chips promptly. This will help maintain the appearance and prevent rust.
Regular Maintenance: Maintain your bike’s mechanical components, such as the chain, gears, and brakes, to prevent issues that could lead to contact with the frame and paint damage.
Consider Frame Wax: Applying a frame wax or protectant designed for bicycle frames can provide an extra layer of protection and shine.
By following these tips, you can help preserve the quality and appearance of your bicycle frame’s paint job, ensuring that it continues to look great and remain in good condition for years to come.
See more: How To Choose Bike Frame Materials
Conclude
This comprehensive guide provides a detailed and step-by-step approach to painting a bike frame, ensuring that your content can outrank others in Google search results. It covers all the necessary information and tips to help readers successfully complete this DIY project while prioritizing safety and quality.