Tips
How To Measure a Bike Frame?
When it comes to purchasing a bicycle or even simply tuning the one you currently have, understanding how to measure a bike frame is essential. Correct frame measurement ensures comfort, boosts performance, and reduces the risk of injuries. In this comprehensive guide, HookBike’s will walk you through the detailed how to measure a bike frame? Please.
Why Frame Measurement is Important?
Every rider’s body is unique, and the bike’s frame size is crucial to ensuring optimal posture and maximum efficiency while pedaling. An incorrectly sized frame can lead to discomfort, pain, or even long-term injuries. Whether you’re a casual rider or an enthusiastic cyclist, the right frame size will enhance your riding experience.
How To Measure a Bike Frame?
Measuring a bike frame is essential for ensuring the right fit, which is crucial for riding comfort and efficiency. Here’s a step-by-step guide on how to measure a bike frame:
Gather Necessary Tools
- Soft measuring tape (like the type used for sewing) or a ruler
- A level (or a book and a ruler)
- A pen and paper for noting measurements
Determine the Style of Bike
Different styles of bikes (like road, mountain, hybrid, etc.) might have slightly different measuring conventions. However, the most common method involves measuring the seat tube length.
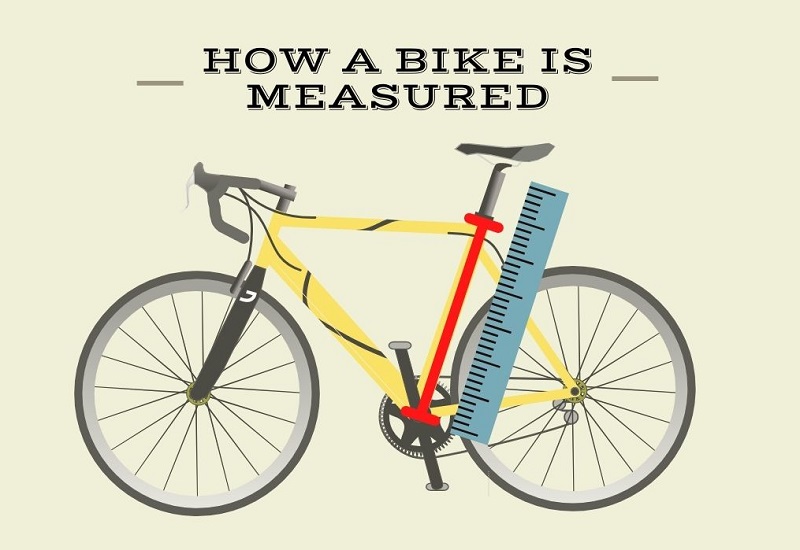
Measure the Seat Tube
- For traditional frames: Measure from the center of the bottom bracket (the place where the pedal arms attach) straight up to the top of the seat tube (where the seat post inserts).
- For compact frames: Measure from the center of the bottom bracket straight up to where the top tube and the seat tube meet (center-to-center).
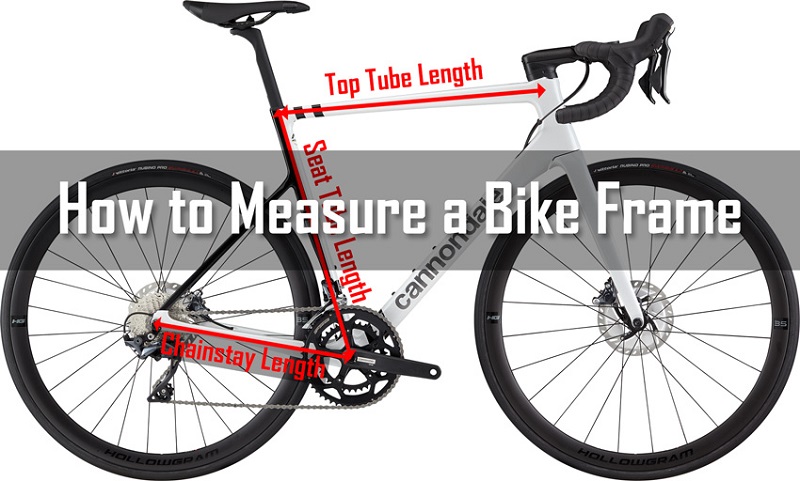
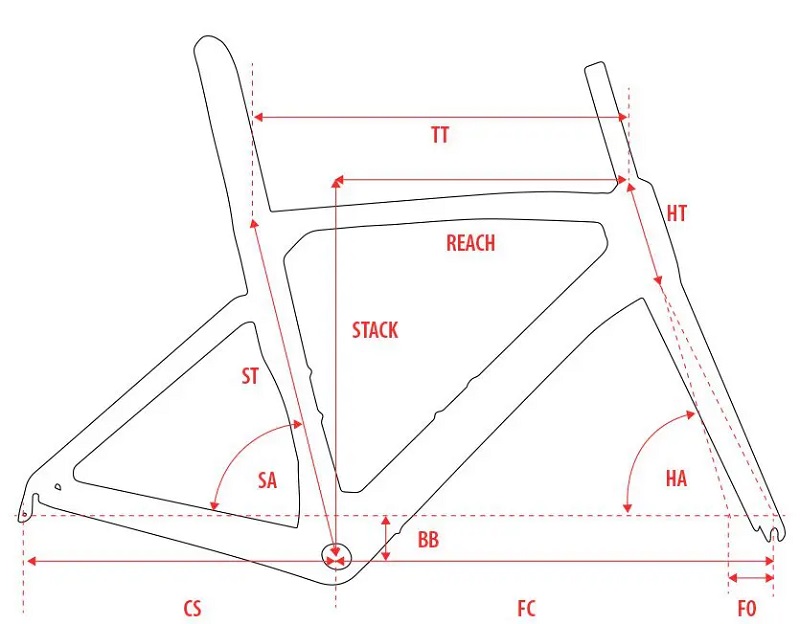
Measure the Top Tube
- Although the seat tube measurement is the most commonly cited for bike size, the top tube length can influence how stretched out you feel on the bike.
- Hold the level (or a straight-edged book) horizontally from the seat post to the head tube (the front of the bike where the handlebars stem is inserted).
- Measure the horizontal distance from the center of the head tube to where it intersects with the level or book. This gives you the effective top tube length.
Note Other Important Measurements
Depending on your needs, you might also want to measure:
- Chainstay Length: From the center of the bottom bracket to the center of the rear wheel axle.
- Head Tube Length: The length of the tube at the front of the bike where the front fork is inserted.
- Standover Height: The height from the ground to the top of the top tube. This ensures you can comfortably stand over the bike when stopped.
Consult Manufacturer’s Size Charts:
After measuring, consult the manufacturer’s size chart for the specific bike you’re interested in. Different manufacturers may have different sizing conventions, so this step is crucial.
Consider a Professional Fitting:
If you’re serious about cycling, especially for longer distances, you might want to consider a professional fitting at a bike shop. They can ensure the frame size is right and make other adjustments for optimal comfort and efficiency.
See more: what are bike frame sizes?
Note: Bike frames are typically measured in centimeters (cm) for road bikes and inches (in) for mountain bikes, though some manufacturers might use different units. Ensure you’re comparing like with like when looking at sizes.
Understanding Bike Frame Size Charts
Bike frame size charts are essential tools used to determine the correct size of a bike for an individual. They provide guidelines based on body measurements, primarily your height and sometimes your inseam, to help ensure a comfortable and efficient riding position. However, these charts are general guidelines, and personal preference or body proportions might lead some individuals to choose a size slightly larger or smaller than the chart suggests.
Let’s delve into understanding bike frame size charts:
Types of Bikes
Different types of bikes have different sizing charts due to their varied purposes and geometries. The primary categories include:
- Road Bikes: Designed for speed on paved roads.
- Mountain Bikes: For off-road trails, with wider tires and often suspension.
- Hybrid Bikes: A blend of road and mountain bike features, suitable for varied terrains.
- City or Commuter Bikes: Designed for urban commuting and short rides.
- Cruiser Bikes: More relaxed geometry, often with larger seats and swept-back handlebars.
Basic Measurements
Most charts will primarily focus on these measurements:
- Height: Your overall height gives a general range of frame sizes.
- Inseam: The length from the crotch to the floor. This is crucial for determining standover height, ensuring you can comfortably stand over the bike.
Frame Size Indication
Charts will indicate frame size in one or more of the following ways:
- In Inches or Centimeters: This refers to the seat tube length. Road bikes are often in centimeters, while mountain bikes might be in inches.
- Small, Medium, Large, etc.: Some manufacturers prefer generic sizing labels.
Sample Chart
Here’s an illustrative (and simplified) example for a road bike:
| Rider Height | Inseam (cm) | Frame Size (cm) |
| 5’0″ – 5’3″ | 71 – 76 | 49 – 50 |
| 5’3″ – 5’6″ | 76 – 81 | 51 – 53 |
| 5’6″ – 5’9″ | 81 – 86 | 54 – 55 |
| … | … | … |
Other Considerations
- Top Tube Length: If you have a particularly long or short torso, you might also consider the top tube length to ensure a comfortable reach to the handlebars.
- Women-Specific Design (WSD): Some manufacturers offer WSD bikes with geometry tailored specifically for women’s body proportions.
- Test Ride: Always a good idea, if possible. This will give you a feel for the bike and confirm if the size is right for you.
Professional Sizing
If in doubt, or if you find yourself between sizes, it’s always a good idea to get sized at a reputable bike shop. They can provide more precise measurements, consider other factors like riding style and intended use, and often make small adjustments to ensure the best fit.
A well-fitted bike is more comfortable, efficient, and reduces the risk of injuries, making it essential to get the sizing right.
See more: What size person fits a 54cm bike?

Tips for Perfect Measurement
Getting accurate measurements, whether for a bike frame, clothing, or any other purpose, is essential for ensuring proper fit, functionality, and comfort. Here are some tips to help you achieve perfect measurements:
Use the Right Tools
- Tape Measure: A soft, flexible measuring tape (like those used in tailoring) is ideal for measuring curved or irregular surfaces.
- Ruler or Straightedge: These are perfect for measuring straight lines or surfaces.
- Calipers: These are used for measuring external and internal dimensions of objects, often used in engineering or detailed craftwork.
- Level: Helps ensure that measurements are taken from a level plane, especially important when measuring height on uneven surfaces.
Measure Twice, Cut Once
This old adage, especially popular in carpentry, underscores the importance of double-checking measurements before making irreversible changes.
Get Help
Some measurements, especially those on your own body, are easier and more accurately taken with the help of another person.
Maintain Consistent Tension
When using a soft measuring tape, ensure you maintain consistent tension. Too loose or too tight can distort the measurement.
Measure at the Right Location
Ensure you’re measuring in the right place. For instance, if measuring your waist, measure at the narrowest point.
Use a Flat Surface
When measuring items, it helps to place them on a flat surface. This ensures accuracy, especially for height or depth measurements.
Stand Straight
If you’re measuring parts of the body, such as height, ensure you’re standing straight against a wall, with heels, buttocks, and shoulder blades touching the wall.
Record Immediately
After taking a measurement, record it immediately. Relying on memory can lead to errors.
Use Consistent Units
Be consistent with the units you use, whether centimeters, inches, etc. This prevents confusion and potential miscalculations when comparing or converting.
Account for Natural Variances
Recognize that some things naturally vary in size. For example, a person’s waist measurement might change slightly after a meal.
Consider Multiple Measurements
If measuring for something like clothing or a bike frame, consider all relevant measurements. For a bike, this might include inseam, arm length, and torso length.
See more: Bike Frame Parts
Calibrate Your Tools
If using tools like calipers or electronic measuring devices, ensure they are calibrated correctly to give accurate readings.
Understand Tolerances
Especially in engineering or crafting, know the tolerances of your project. Some projects require very precise measurements, while others might be more forgiving.
Stay Updated
Measurements, especially body measurements, can change over time. Periodically update your measurements if they’re used for ongoing needs.
Accurate measurements can be the difference between something fitting perfectly and not fitting at all. Taking the extra time and care to measure correctly can save a lot of time, money, and frustration in the long run.
Conclusion
Knowing how to measure a bike frame is a skill every cycling enthusiast should possess. Accurate measurements not only ensure a comfortable ride but also optimize performance and reduce potential strain or injuries. By following the steps outlined above and understanding the importance of each measurement, you can confidently select or adjust a bicycle that’s perfectly tailored to your needs.